Friday, June 22, 2012

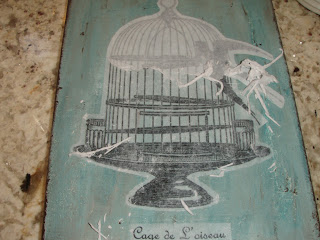
Ballard Design Giclee look alike project


 Have you ever looked through Ballard Designs Giclee prints and thought, "Hey, I could do that!" Well, I finally did it. I was looking at all the beautiful graphics from the Graphics Fairy and I saw some that looked similar to what I saw in Ballard Design. Here are the pictures in Ballard Design:
 Pretty cool huh?

Here are my "replica's".


 What do you think? Not exact, but pretty close.

Here is what I did.
1.  I bought some blank canvas. I used 8x10, but you can use any size you want.
2. I painted the entire canvas, including the sides raw ochre. (Any color of brown will be ok)
3. Once the brown was dry I painted the top a cream color.
4. Once the cream was dry I sort of came up with my own blue. (I added a hint of black and a lot of white to a standard blue acrylic)
5.Next is hard for me to explain but I sort of white washed using brown then white then blue and finally white until I got the look I wanted. I rubbed in between coats to give it an aged look.
6. My final step was to take a little piece of sponge and touch up the sides and the edges of the front with brown.

7. After the paint was dry I sprayed the entire canvas with a spray a matte varnish. This step I believe is absolutely essential as I discovered on my first attempt. If you don't protect the paint, when you get to the water stage, the paint will come off with the water. SO PROTECT YOUR PAINT! (I had to re-do the whole thing after my first attempt because I didn't do this.
8. Now print out your image. I used several graphics from http://www.graphicsfairy.blogspot.com/ and worked with them in photoshop to get what I wanted. The birdcage is from here:  https://blogger.googleusercontent.com/img/b/R29vZ2xl/AVvXsEhD5MAP6J9KPLB-dWlSV5tQrzDqZhFXbA6fQSCzw5Mv9ZDYHoecECMKh12d4_zrMpnbix5f1TBo_2ncCxSLuqeL8vb7s_vpBo54D835-GKOf7KS2yw8761EOPnDKkvBIbYO6Oim7zsYD48/s1600/birdcageroundgfairy004b.jpg.
The chair is from here: http://www.graphicsfairy.blogspot.com/search?q=french+chair. I added some birds from various graphics and wrote out the words on each canvas in photo shop. When you print make sure it is a mirror image of the picture.
9. Next cut out your image leaving a little border. I cut out the image of the bird cage and the chair separate from the words.
10. Use a sponge brush and mod podge the front of the image. Place the glued side down on the canvas. Work out wrinkles and air bubbles with a spoon or anything else you have on hand. Be careful not to rip the paper.
11. Once the glue is dry (I left mine overnight) use a wet sponge brush and get the image wet. Once the paper is wet enough start rubbing it with your finger.
At first, large layers of paper will start to slough off.
Keep rubbing in circular motions and try to get all the residue paper off. Sometimes its hard to see it all until its dry, so try it again if there is any left after drying.
12. Once the canvas is dry spray it again with the varnish. I think any kind will work.

There you have it. A Ballard Design copy. Have fun and don't worry about mistakes. Like I said earlier, I had to re-do my first one over completely.


Saturday, June 9, 2012

First graphics project

 After seeing so many people on Pinterest using graphics to repurpose old ugly stuff I decided to give it a try.I found this old lap tray collecting dust which I thought was the perfect thing to use on my first project.  I forgot to take before pictures, but this is basically what I did.
1. painted the whole thing white
2. found this French Cacao Ephemera Graphic  from the Graphics Fairy (love love love this site)
3. enlarged it using the free website called Block Posters
4. I printed the graphic out then taped some carbon paper on the backside of the graphic.
5. I taped the graphic to the lap tray and traced the graphic using a ball point pen
6. Next I simply painted the outline. (no artistic talent required)
7. Once the paint was dry I very lightly used antiquing medium to give it a slightly aged effect.
8. Lightly sanded the top
9. Spayed the entire tray with matte acrylic polyeurethene.
Voila - my finished lap tray. Next project - putting graphics on some off white, boring pillows.


Friday, June 8, 2012

Eastlake Chalkboard


This is a frame I've had sitting around in my garage forever. I can't even remember when I got it. I was looking at Pinterest and a light bulb went off in my head--chalkboard.

So I cleaned up the frame, (it was very dirty), measured the opening in the back and went to the hardware store and had this piece of MDF board cut to my measurements. (You will probably have left over MDF because it comes in big sheets. Save it for a rainy day). I sanded slightly the side I'm going to spray to give it some tooth. The chalkboard paint sticks better.

Here's the spray I used. Krylon Chalkboard Paint. I actually wanted it to be magnetic, too, and have been wanting to try this magnetic paint. I sprayed 2 coats of this first, but it seemed "hairy" so I sanded it a little. That was a mistake because I sanded off all the magnet particles. I'll try this again on another project. I hear you can get magnet/chalkboard paint at Sherwin Williams. I'm gonna try that next time. Anyway, then I sprayed the chalkboard paint on, 2 coats, waiting between each coat. After it dried, I wiped it down really good with a paper towel because black dust rubs off.

I was browsing through Pinterest one day, and I saw that someone else had used an old drawer pull turned upside down to hold the chalk. I just happened to have one in my "stash of stuff just in case I need it one day things". I screwed it to the bottom of the frame.
Finally, I placed the painted MDF into the frame, nailed it into place with brads, strung a picture wire across two eye hooks in the back, and VOILA! I love it and it was so easy. I have many other frames just waiting to be "chalkboarded".


Sunday, June 3, 2012

dessert trays


Hi everyone. Here is a DYI project I have seen many times. I enjoyed the idea so much that I wanted to share. I started with 2 dinner size plates, 3 small plates,  some clear dessert-type cups, and clear candle holders. I acquired these items at the thrift store. You can use new or old, I happen to like the old floral dishes. For construction I suggest using E 6000 Glue from Michaels or another craft store. You'll need to figure out the best arrangements. I chose similar plates-one large and one small, one dessert dish, and one candlestick for each set.

 These are all my choices.
This is the first set I put together.
I put it together the way I liked it and started gluing from the bottom up. I decided to put the candlestick upside down to take up less surface space on the large plate. I also turned the dessert cup upside down because it has a pretty fluted edge. Make sure everything lines up from top to bottom on every side. I turned and shifted it around as I centered it. You're also supposed to put the glue on both objects before putting it together, so you need to find the center of the plate to put the glue on. An easy way to do this is put the glue on the candlestick, set it on the plate and lift it back off. Now you have a line of glue close to where you need it to be. Put the glue on the plate now, wait two minutes (as per the glue instructions), and glue together. If you get any extra glue on the plate, have some goo-gone and a cotton ball nearby and wipe the dish.
This is the second set I liked together. The plates both had some gold trim in them , so they  went together well. (Later I found a gold finial from an old lamp that I added to the top).

Here is the finished arrangement for this set with the gold finial. Again , I turned both the dessert cup and candlestick upside down.
I had an extra little plate, a small candlestick, and dessert dish that I decided to make into a little  dessert  tray. I glued the candlestick to the dessert dish to make it taller. (This would look really cute with a cupcake on it). I found this random dome later and added it. It matched perfectly. 
This is the dome off of the set.

Here is the final outcome after everything is glued. I can see these at a wedding buffet or bed and breakfast, holding cupcakes, truffles, or little tea sandwiches
This is so so easy to do and gets rid of those random dishes laying around.