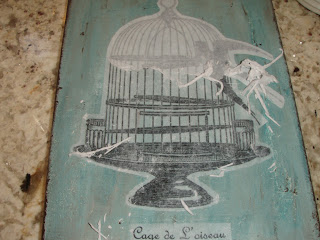
Have you ever looked through Ballard Designs Giclee prints and thought, "Hey, I could do that!" Well, I finally did it. I was looking at all the beautiful graphics from the Graphics Fairy and I saw some that looked similar to what I saw in Ballard Design. Here are the pictures in Ballard Design:
Here are my "replica's".
Here is what I did.
1. I bought some blank canvas. I used 8x10, but you can use any size you want.
2. I painted the entire canvas, including the sides raw ochre. (Any color of brown will be ok)
3. Once the brown was dry I painted the top a cream color.
4. Once the cream was dry I sort of came up with my own blue. (I added a hint of black and a lot of white to a standard blue acrylic)
5.Next is hard for me to explain but I sort of white washed using brown then white then blue and finally white until I got the look I wanted. I rubbed in between coats to give it an aged look.
6. My final step was to take a little piece of sponge and touch up the sides and the edges of the front with brown.
7. After the paint was dry I sprayed the entire canvas with a spray a matte varnish. This step I believe is absolutely essential as I discovered on my first attempt. If you don't protect the paint, when you get to the water stage, the paint will come off with the water. SO PROTECT YOUR PAINT! (I had to re-do the whole thing after my first attempt because I didn't do this.
8. Now print out your image. I used several graphics from http://www.graphicsfairy.blogspot.com/ and worked with them in photoshop to get what I wanted. The birdcage is from here: https://blogger.googleusercontent.com/img/b/R29vZ2xl/AVvXsEhD5MAP6J9KPLB-dWlSV5tQrzDqZhFXbA6fQSCzw5Mv9ZDYHoecECMKh12d4_zrMpnbix5f1TBo_2ncCxSLuqeL8vb7s_vpBo54D835-GKOf7KS2yw8761EOPnDKkvBIbYO6Oim7zsYD48/s1600/birdcageroundgfairy004b.jpg.
The chair is from here: http://www.graphicsfairy.blogspot.com/search?q=french+chair. I added some birds from various graphics and wrote out the words on each canvas in photo shop. When you print make sure it is a mirror image of the picture.
9. Next cut out your image leaving a little border. I cut out the image of the bird cage and the chair separate from the words.
10. Use a sponge brush and mod podge the front of the image. Place the glued side down on the canvas. Work out wrinkles and air bubbles with a spoon or anything else you have on hand. Be careful not to rip the paper.
11. Once the glue is dry (I left mine overnight) use a wet sponge brush and get the image wet. Once the paper is wet enough start rubbing it with your finger.
At first, large layers of paper will start to slough off.
Keep rubbing in circular motions and try to get all the residue paper off. Sometimes its hard to see it all until its dry, so try it again if there is any left after drying.
12. Once the canvas is dry spray it again with the varnish. I think any kind will work.
There you have it. A Ballard Design copy. Have fun and don't worry about mistakes. Like I said earlier, I had to re-do my first one over completely.


Hi guys, wow love your blog! I too am a shabby chic type of gal, just retired, I wear paint daily! LOL
ReplyDeleteI am your newest follower! Stop over for a visit won't you? I'm also a Cali native! Born and raised in LA, such beautiful weather and gardens! I miss the dirt! :) hugs kat =^.^=
Hi Kat,
DeleteThank so much for the nice comment. I like your blog too. Congrats on your retirement.
Take Care,
Kathy
I think I like yours better!! I love the blue. I also am a fan of The Graphics fairy. Thanks for the inspiration! I'm going to have to try this!!
ReplyDeleteWarm regards,
Lorraine
www.lorrainesoohlala.blogspot.com
Hi Lorraine,
DeleteThank you so much! They were really fun to make. You should definitely try it. This was my first one, so there was a lot of trial and error. Now that I know how to do it though, I will definitely be making more.
Take care,
Kathy
I agree, yours are the best! I love them! Thanks for sharing how you did them.
ReplyDeleteAngela
Just found your blog and have been enjoying your tutorials on graphic transfers~nicely done! I love this project and hope to try it!
ReplyDelete